
Your Custom Text Here

Downward Facing Dog: Essential Yoga Posture and Beginner Modifications for Maximum Benefits
Downward Facing Dog and 2 Variations for Beginners" is a helpful guide for those new to yoga. The article introduces the classic Downward Facing Dog pose and provides two variations tailored specifically for beginners. Whether you're looking to improve flexibility, build strength, or simply relax, this guide offers a great starting point for your yoga journey.
Downward Facing Dog: Essential Yoga Posture
The yoga posture known as Downward Facing Dog (Adho Mukha Svanasana) is familiar to all. Whether or not you engage in yoga, you have likely come across this pose at some point.
Now, let us examine it more closely and delve into the two modifications designed for beginners to enhance this essential yoga posture's mental and physical advantages.
Downward Facing Dog Version 1: The Original Version

To get into a downward-facing dog, starting from the tabletop pose is commonly recommended,
From the tabletop, lift the knees up off the floor.
Through that, extend to find the entire length of the spine. A downward-facing dog's most important aspect is finding the full release of the spine to get the most benefits.
Keep your head down, pointing downward.
The legs could be straightened or bent if the spine is adequately elongated without rounding.
For beginners, stay in the pose for 2-3 breaths and gradually build up to a longer duration.
The downward-facing dog can be modified for individuals with different ranges of motion, especially those with less mobility training. Below are the most recommended modifications for entry-level beginners or anyone who finds it hard to accommodate into the full version yet,
Option 2. Modification Bend Knees Version Downward Facing Dog

Based on the steps from the original version, slightly bend your knees towards your chest while maintaining the spine in proper alignment without rounding.
Stay in this pose for around 3-5 long deep breaths.
Option 3. Modification with movement - Paddling in Downward Dog
Based on option 1, paddling your feet in and out in the downward dog.
Start slightly bending your right knee towards your chest while straightening your left leg. Feel the left leg stretch from the calf muscles to the hamstring and hips. Repeat the same motions on the other side.
For active practice, keep your paddling lightly and smoothly; at any point, if you feel a deeper stretch and connection on one of the legs, you may stay there longer.


What are the benefits of a downward-facing dog?
The Light of Yoga by B.K.S. Iyengar emphasizes the numerous benefits of incorporating downward-facing dogs into one's yoga practice. Here's a concise summary in bullet points.
When one is exhausted, staying longer in this pose removes fatigue and brings back the lost energy.
The pose is perfect for runners who get tired after a hard race.
The pose relieves pain and stiffness in the heels and helps to soften calcaneal spurs. It strengthens the ankles and makes the legs shapely.
This asana helps eradicate stiffness in the region of the shoulder blades, thereby relieving arthritis of the shoulder joints.
The abdominal muscles are drawn towards the spine and strengthened. The heart rate is slowed as the diaphragm is lifted to the chest cavity.
Those afraid to do Siraasana (headstand) can conveniently practise this position. As the trunk is lowered in this asana, it is fully stretched, and healthy blood is brought to this region without any strain on the heart.


Learn the Modified Sun Salutation Sequence for Beginners
Sun Salutation is a must-learn sequence for beginners in yoga. However, it can be challenging for many students to master the sequence due to its complexity. As a yoga teacher, I have modified the sequence over the years to help my students gradually build the strength and mobility required for their long-term yoga journey. In this article, I will guide you through the modified version of the Sun Salutation sequence with step-by-step instructions, enabling you to lay a solid foundation for your future success. Remember to breathe deeply and move along with the rhythm of your breath to enjoy the beauty of Sun Salutation.
Sun Salutation is the must-to-learn when introducing yoga to beginners. Interestingly, throughout my years of teaching, the Sun Salutation sequence has been more challenging than it seems to most beginners.
Many of my students were frustrated when they first learned the Sun Salutation; hence, I modified it so they could eventually taste the sequence's beauty and build up the strength and mobility required for their long-term journey.
Sun Salutation varies slightly between different yoga styles and traditions, but whatever version you aim for, this modification will lay a solid foundation for your future success.
Step 1 - Mountain Pose - (Tadasana)
Start from standing in Tadasana and rebuild the intention of standing firmly grounded.
Keep your feet shoulder distance, and feel the power of grounding while standing.
Step 2 - Arms Extended in Mountain Pose (Utthita Hastasana in Tadasana)

Arms Extended in Mountain Pose (Utthita Hastasana in Tadasana)
Raise your arms next to your ears.
Chest slightly lifted, gaze upward.
Enjoy deep breaths in this gentle front body opening.

Dive into a standing forward bend with your knees bent.
Grab your ankle with your hands.
Bring the belly close to the thighs as much as possible.
Elongate the spine.
Keep neck and head relaxed.
Step 4: Half Forward Bend (Ardha Uttanasana)

Half Forward Bend - Ardha Uttanasana
Lift head halfway.
Elongate the spine.
Keep knees slightly bent at a comfortable level.
Step 5: Low Lunge (Anjaneyasana)

Low Lunge (Anjaneyasana)
Step your right leg back, and bring your knee to the floor.
Arms reach up next to the ears.
Keep the foundation solid, and remain steady in the pose.
Step 6: Cat Cow (Marjaryasana)
On inhalation, drop the belly and head up.
On exhalation, round the back chin of the chest.
Exploring the space within your space.
Move along with the rhythm of your breath.

Cat Cow (Marjaryasana) - Cow Pose

Cat Cow (Marjaryasana) - Cat Pose
Step 7: Downward-Facing Dog - Adho Mukha Svanasana

Downward-Facing Dog - Adho Mukha Svanasana
From the Table Pose (the set-up of Cat-Cow), tuck your toes under and extend the back leg up.
Spread the fingers wide with a firm grip on the floor.
Extend the spine long, and the buttocks lift.
Keep the spine long and straight, and bend your knee to adjust the spine's elongation.
Step 8: Three-Legged Dog - (Tri Pada Adho Mukha Svanasana)

Three-Legged Dog - (Tri Pada Adho Mukha Svanasana)
From Downward Facing Dog in Step 7, bring the feet together. Knees can remain bent.
Extend the right leg up without putting pressure on the upper body.
Step 9: Low Lunge (Anjaneyasana)

Low Lunge (Anjaneyasana)
From Three-Legged Dog in Step 8, step the right foot forward between the palm.
The body comes all the way up with arms reached up.
Maintain the pose.
Step 10. Half Forward Bend - Ardha Uttanasana

Half Forward Bend - Ardha Uttanasana
From Step 9, step the left foot forward into a standing forward bend.
Lift head halfway.
Elongate the spine.
Keep knees slightly bent at a comfortable level.
Step 11: Standing Forward bend (Uttanasana)

Dive into a standing forward bend with your knees bent.
Grab your ankle with your hands.
Bring the belly close to the thighs as much as possible.
Elongate the spine.
Keep neck and head relaxed.
Step 12. Arms Extended in Mountain Pose (Utthita Hastasana in Tadasana)

Arms Extended in Mountain Pose (Utthita Hastasana in Tadasana)
Slowly coming up to a standing pose.
Reach arms up, chest slightly lifted.
Step 13: The Prayer Pose (Pranamasana)

The Prayer Pose (Pranamasana)
Bring Palms together into prayer, taking a moment to centre the mind and body.
Keep breathing slowly and gently.
Step 14: Back to Mountain Pose.

Return to mountain pose and feel the breath and circulation running inside the body.
Stay a moment of peace.
Repeat Steps 1-12, but start by stepping the left leg back this round.
Conclusion
In conclusion, Sun Salutation is a fundamental sequence in yoga that helps build strength, flexibility, and mindfulness. It may seem challenging at first, but with consistent practice and modifications, beginners can eventually master it and enjoy its beauty. Remember to breathe deeply and move along with the rhythm of your breath.
More Yoga Blogs


5 Best Yoga Poses To Do During Period - Yoga for Women
If you're struggling with menstrual pain and discomfort, these 5 gentle yoga poses are perfect for you. Designed specifically for heavy blood flow days, this article provides a detailed breakdown of each pose and a video tutorial to help you perform them safely and correctly. With regular practice, these poses can help you feel more relaxed and comfortable during your menstrual cycle. So don't wait, try them out today and experience the benefits for yourself!
Yoga Sequence for a Restful Period - Yoga for Women
One of the five tips we mentioned in our previous article on yoga for menstruation is to keep the sequence comforting and intentionally gentle. This week, let's dive into one of our yoga sequences for menstruation on YouTube.
As always, I hope my yoga content helps you navigate the ups and downs of life, allowing you to savour each moment with abundant health, wealth, and happiness.
The five yoga poses sequenced below are designed for a restful period, especially during heavy blood flow days when you are physically tight, exhausted, and fatigued. This sequence is intended to be soothing, relaxing, and gentle. You do not need to explore the deepest level of your range of motion; instead, stay where it makes you feel good and at ease.
Please note that this sequence is designed with the most minor support of your yoga tools. You may need more tools to support you if some part of your body is feeling pressured.
If you need more clarification about your yoga practice, I have a solution for you - a Free 60-minute Yoga Consultation. The first session is Free for everyone! Just click the button below to claim your Free consultation.
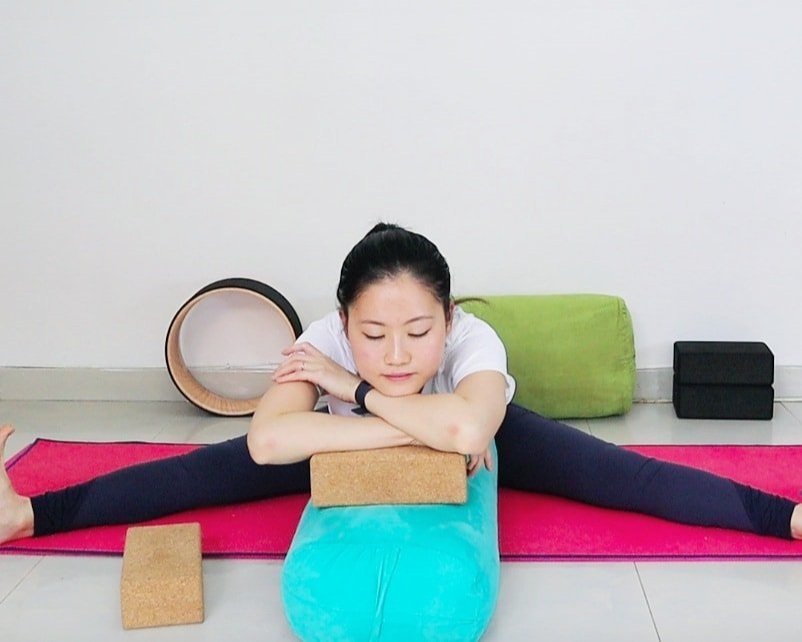
Yoga Pose 1: Reclined Butterfly Pose (Supta Baddha Konasana)
To Set the Pose: Lying down on the floor, a block or pillow for head and neck support is optional.
Reclined Butterfly Pose (Supta Baddha Konasana)
Start by resting your head comfortably on the block or pillow.
Bend your knees in an external rotation, with the soles of the feet touching one another.
You can set the heels further away or closer depending on how comfortable you feel.
Do not attempt this pose if there's pressure on the knees.
Seek professional advice for modifications if needed.
Yoga Pose 2: Happy Baby Pose (Ananda Balasana)
To Set the Pose: Lying down on the floor, a block or pillow for head and neck support is optional.
Happy Baby Pose (Ananda Balasana)
From lying down, bend both of your knees towards your chest.
Spread the knee and feet slightly wider than the torso.
Palms reach out to grab the outer or inner edge of your feet.
Do not attempt this pose if there are pressures on the knees.
Seek professional advice for modifications if needed.
Yoga Pose 3: Reclined Big Toe Pose B (Supta Padangusthasana B)
To Set the Pose: Lying down on the floor, it is recommended that a yoga strap be used to assist.
Reclined Big Toe Pose B (Supta Padangusthasana B)
From lying down, wrap the strap around your left foot.
Extend your left leg to the left side. Hold the strap comfortably while maintaining both hips and shoulders evenly on the floor.
Feel the gentle stretch on your left leg.
Stay in the pose for 2-3 minutes with gentle, steady breathing.
Change to the right leg afterwards.
Yoga Pose 4: Supine One Knee to Chest / Half Wind Release Pose (Ardha Pavan Muktasanaa)
To Set the Pose: Lying down on the floor, a block or pillow for head and neck support is optional.
Supine One Knee to Chest / Half Wind Release Pose (Ardha Pavan Muktasanaa)
From lying down, bend the right leg and hug the knee to chest.
Holding the leg from the front of the calf muscles.
Feel the gentle release from the hip.
Stay in the pose for 2-3 minutes with gentle, steady breathing.
Change to the left leg afterwards, and stay with an equal amount of time.
Yoga Pose 5: Supine Spinal Twist Pose (Supta Matsyendrasana)
To Set the Pose: Lying down on the floor, a block or pillow for head and neck support is optional.
From lying down, hug both knees to chest.
Drop both legs to the left side and feel the gentle release from the waist.
To progress further, turn the head to the right side.
Stay in the pose for 2-3 minutes with gentle, steady breathing.
Switch sides and stay for an equal amount of time.
Supine Spinal Twist Pose (Supta Matsyendrasana)
Supine Spinal Twist Pose (Supta Matsyendrasana)
Conclusion
In conclusion, these five yoga poses can help you feel more relaxed and at ease during your period, especially on heavy flow days when you may feel physically exhausted and tight. Remember to listen to your body and only go as far as it feels comfortable for you. And if you need additional support or advice, don't hesitate to seek professional guidance. With regular practice, yoga can be a powerful tool for managing menstrual discomfort and promoting overall health and well-being. So go ahead, give these poses a try and see how they work for you!

Five Yoga Tips for Women During Menstruation
This article offers tips for women practicing yoga during their menstrual cycle. It covers poses to avoid, gentle yoga practices, and the importance of listening to your body. With this advice, women can maintain their yoga practice during menstruation and connect with their inner selves.
Today, let’s talk about yoga for women during menstruation. Many wonder whether or not to practice yoga during menses and what to do and avoid. There’s never one absolute formula for everyone because women experience their periods differently. Over my decade of teaching and practising yoga, I have come up with the following Five suggestions, which seem to apply to most of my students.
I hope these five tips also help you with your yoga practice during this particular time of the month,
Tips One - Yoga poses to avoid.
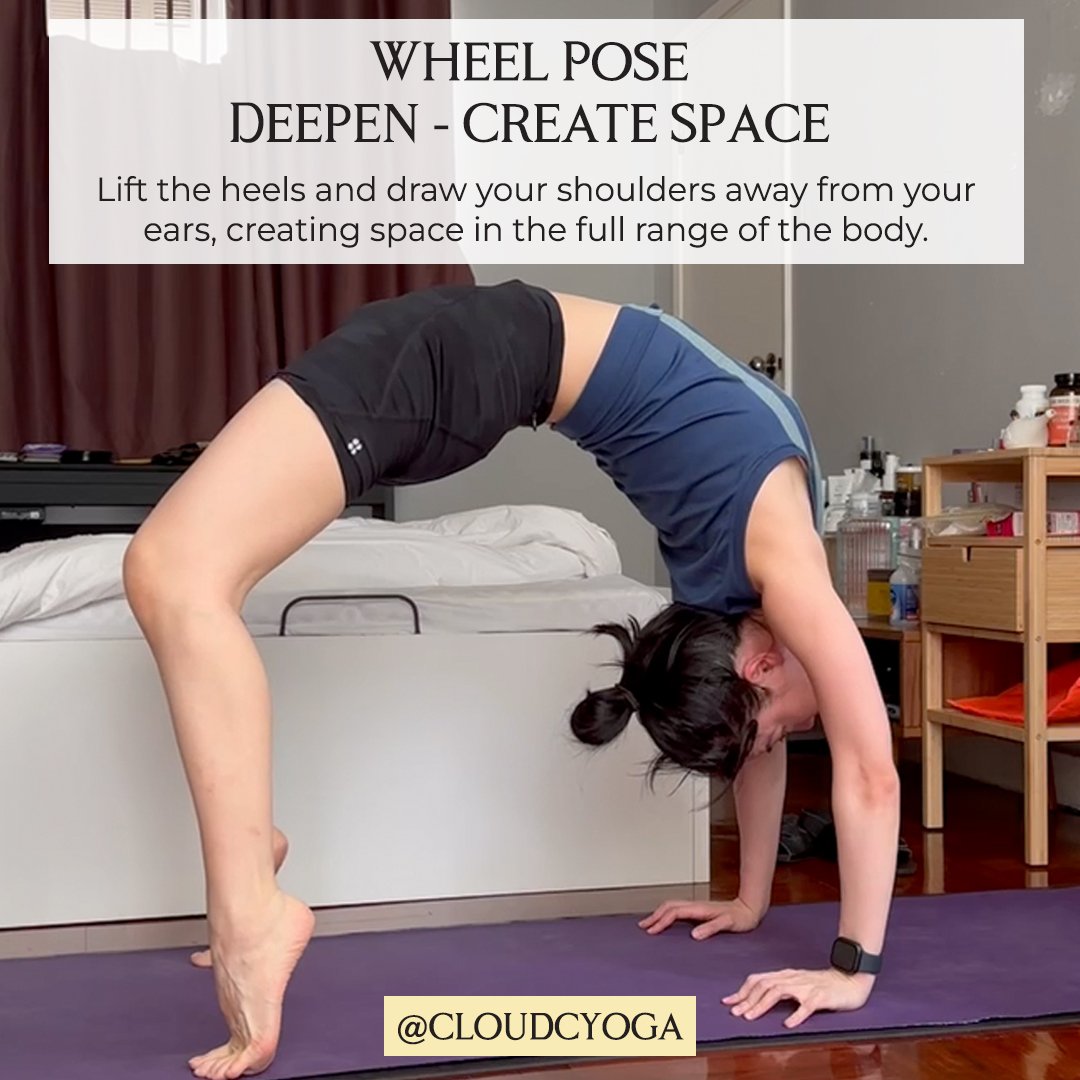
During menstruation, the general rules of practice are to avoid inversion, deep twisting, deep forward bend, back bending, core strengthening or any poses that may pressure your lower abdomen. Take a break from poses such as Headstand (Sirasana), Wheel Pose (Urdhva Dhanurasana) and Crow Pose to avoid menstrual-related discomfort.
Tips Two - Avoid demanding yoga practices during heavy blood flow days.
During heavy blood flow days, avoid practices that are required to be more intense, such as vinyasa flow, inversion and arm balancing. Instead, seek sequenced classes to offer you more profound relaxation and reconnect with your inner self.
Tips Three - Keep it gentle.
I understand how great it is to keep up your daily practice, and most yogis feel like keeping their yoga practice up during periods (even heavy flood days).
We all agree that yoga gives us more energy, but on special days, choose something gentle. Your top priority in practising yoga at this time should be focusing on soothing your mind and body.
Tips Four - Listen to your body.
The most important thing is to listen to your body. Our bodies change daily, and there’s so much going on during our moon cycle; hormonal changes, mood swings, and other physical symptoms can make us feel more vulnerable than at different times. Embrace it, and treat yourself better.
Tips Five - Class theme suggestions during the period.
When deciding which class to enrol, consider the following theme during your period,
Yoga does not intend to push hard but to nourish our mind, body, and soul. Listen to your body and choose what feels best for you; even resting is a good practice!
Conclusion
In conclusion, practising yoga during menstruation can be a challenging experience, but it can also be an opportunity to connect with your body, mind, and soul on a deeper level. By following the tips mentioned above, you can take care of yourself during this time and make the most of your yoga practice. Remember to listen to your body, avoid demanding poses, and choose gentle yoga practices focusing on relaxation and nurturing your inner self. With these tips in mind, you can continue enjoying yoga's many benefits during your menstrual cycle.

7 Things Beginners Should Know About Yoga
Like all kinds of exercise, Yoga is for everyone, regardless of age, sex, or fitness background, provided you are well-versed in your physical condition. I've compiled a list of the top seven questions my beginner students often ask and what they wish they had known before starting Yoga. If you're considering starting Yoga, I hope this article provides some helpful insights.
You came across this article probably because you've been thinking about "doing some yoga". However, before diving into any new practice, it's essential to do your research and understand what you're getting into.
I've compiled a list of the top seven questions my beginner students often ask and what they wish they had known before starting Yoga. If you're considering starting Yoga, I hope this article provides some helpful insights.
The 7 Things Beginners Should Know Before Practising Yoga cover the following,
Who can do yoga? Am I too old to start yoga?
Am I too stiff to do yoga?
Can I start yoga without a prior fitness background?
What is the best class for a beginner to start learning Yoga?
How often should I practice yoga to benefit from it?
Is it okay to do my private yoga class online if I am a beginner?
Can I do yoga if I am pregnant or during menstruation?
1. Who can do yoga? Am I too old to start yoga?
Like all kinds of exercise, Yoga is for everyone, regardless of age, sex, or fitness background, provided you are well-versed in your physical condition. Yoga is a comprehensive practice that cares for your mental, physical and spiritual health. As humans, we all need it.
Typically, during a 60 to 90-minute session, you'll engage in breathing exercises (pranayama), yoga postures (asana), meditation, and deep relaxation (savasana). Yoga classes cater to various needs, such as healthy ageing, stress relief, prenatal Yoga, and women's health. Please ask the teacher for guidance if you need clarification about what class to join based on age or physical condition.
Over the past decade, I have taught Yoga to beginners from different age groups, ages 20+ to 80+. Every class I taught was explicitly designed based on the participants, so asking the teacher may be the best way for you to pick the suitable class.

Each yoga posture (asana) can be modified to cater to individual needs.
2. Am I too stiff to do yoga?
No one is ever too stiff or flexible to practice Yoga because a proper yoga practice brings the body back to its most balanced condition.
My students often ask me this question, especially those new to Yoga and intimidated by its "stretchy image". It's important to understand that Yoga is not just about being extremely flexible but rather about finding balance in our bodies to improve our overall well-being. Interestingly, if you have tight hips, shoulder tension, or experience physical discomfort due to tightness, you will benefit more from Yoga than naturally flexible ones.
A practitioner with limited flexibility can gain advantages by enhancing their range of motion. At the same time, highly flexible people can benefit from increasing their strength through Yoga practice. Therefore, regardless of their level of flexibility, anyone can begin practising Yoga. It is important to establish our intention of achieving a more balanced self in terms of physical, mental, and spiritual aspects through Yoga.
3. Can I start yoga without a prior fitness background?
Absolutely! The answer is definitely yes! Numerous individuals, ranging from 20 to 80 years old, start on their Yoga journey without any prior fitness training. Yoga is undoubtedly one of the finest ways to begin your fitness journey, even without previous experience.
Yoga poses greatly emphasise alignment, enabling you to understand every aspect of your body better. If you have led a sedentary lifestyle, you may need to familiarise yourself with the functioning and coordination of your muscles and joints. Beginner yoga will benefit you as it acquaints you with the fundamental postures encompassing the essential elements of your physical being.
By gaining a deeper understanding of your body, you can also explore various physical activities like hitting the gym, trying pilates, or other disciplines that pique your interest. In conclusion, try Yoga if you want to kickstart your fitness journey and have yet to be active. You're more than welcome to begin your workout adventure now!
4. What is the best class for a beginner to start learning Yoga?
The best way for a beginner to start Yoga is to learn directly with a teacher in a private class, either in-person or online. Although private classes may be more expensive than group classes, the advantages are truly transformative.
Starting your yoga journey with personalised 1-on-1 sessions sets a strong base for your practice. With individualised attention, your teacher can tailor the training to suit your needs and abilities. Each person is unique, and in a private class, you can focus on the safest techniques for your body. Building a solid foundation is crucial in avoiding injuries in the future.
By learning with a qualified teacher who can correct and inspire you, you learn more about yourself than in a group setting. Yoga is known for its inclusivity, and each yoga posture (asana) can be modified to cater to individual needs. Taking private yoga lessons as a beginner can teach you how to adapt poses according to your specific condition. This will help you feel more confident and prepared when you join group classes, as you will already have the knowledge to practice safely!
When looking for a qualified yoga teacher, ensuring that the teacher teaches regularly and has a wealth of experience is essential. Putting your health in an experienced teacher's hands is the top priority.
5. How often should I practice yoga to benefit from it?
Regular practice is essential when it comes to Yoga! It's more beneficial to have short and consistent sessions (15-20 minutes) rather than long sessions (60 minutes or more) once in a while.
Here's a suggested Week Plan that I often recommend for my beginner students during the initial practice period,
Have a 60-minute private session with your teacher.
Aim for two to three 15-25 minute self-practice sessions to keep your body moving.
The initial period depends on individual physical conditions and daily schedules. It's important to follow your schedule naturally without pushing yourself too hard. Remember, rest should always come first when it comes to staying healthy. Make sure to talk to your teacher to devise the best plan!
6. Is it okay to do my private yoga class online if I am a beginner?
If your favourite teacher lives far from you, opting for online classes can be a great choice in today's world. With the increasing popularity of online Yoga, numerous yoga instructors have adapted to teaching it virtually. As long as your teacher can provide clear instructions and demonstrations, it's worth trying. The advantage of practising online is that you have a wider selection of teachers, making it easier to find the perfect fit.
Of course, if you can schedule an in-person class with your favourite teacher, that's ideal!
7. Can I do yoga if I am pregnant or during menstruation?
You can continue practising Yoga during pregnancy (except for the first three months) and menstruation, just like any other exercise. However, having enough knowledge and practice and seeking guidance from an experienced teacher is important.
This article does not provide a comprehensive overview of Yoga during pregnancy and menstruation, but you can use the following information as a reference,
Yoga during menstruation: Avoid inverted postures, intense twists, and backbends. Instead, focus on a gentle practice with supported forward bends and restorative postures. Pay attention to your body's needs and prioritise rest, especially during heavy flow days.
Yoga During Pregnancy: Many women find Yoga to be a wonderful experience during pregnancy. However, avoiding Yoga during the first three months is recommended. It is crucial for pregnant women to follow specific modifications, so it's best to practice under the guidance of an experienced teacher.
Conclusion
In conclusion, Yoga is a practice that offers countless benefits for our physical, mental, and spiritual well-being. It's never too late to start your Yoga journey, regardless of your age, flexibility, or fitness background. As a beginner, it's essential to do your research, ask questions, and find a qualified teacher who can guide you through the practice. Remember that Yoga is a personal journey, and each individual's needs and abilities are unique. By starting with a solid foundation through personalised 1-on-1 sessions, you can build your confidence and prepare yourself to join group classes. So, take the first step, and begin your Yoga journey today!
Disclaimer: The content on this channel is for informational purposes only and does not contain medical advice. Please get in touch with your physician or qualified healthcare provider with any questions regarding your medical conditions.
More Yoga Articles

Five Yoga Poses for Tight Hips
We all encounter the discomfort of tight hips at times. Luckily, yoga is here to help us out. Yoga improves our overall body mobility and helps release tightness in our hips. Let’s dive into the five poses in this article.
Five Yoga Poses for Tight Hips for Greater Mobility, One Free Video Tutorial Included
We all encounter the discomfort of tight hips at times. Luckily, yoga is here to help us out. Yoga improves our overall body mobility and helps release tightness in our hips. I've included five recommended yoga poses and One Tutorial on YouTube for free in this article. Read until the end for the free video tutorial.
As always, seek professional guidance for the best results. You can either book a class with us or practice under the guidance of your trusted yoga teacher!
Five Yoga Poses for Tight Hips
Yoga Pose One - Light and Gentle Hip Movement
To Set the Pose: Sitting at the centre of the yoga mat.
Bend your knees and place your palms around one to two palms away from your hip.
Drop your knees left and right while turning your head in the opposite direction.
Practice for around 5 to 10 rounds with steady breathing.
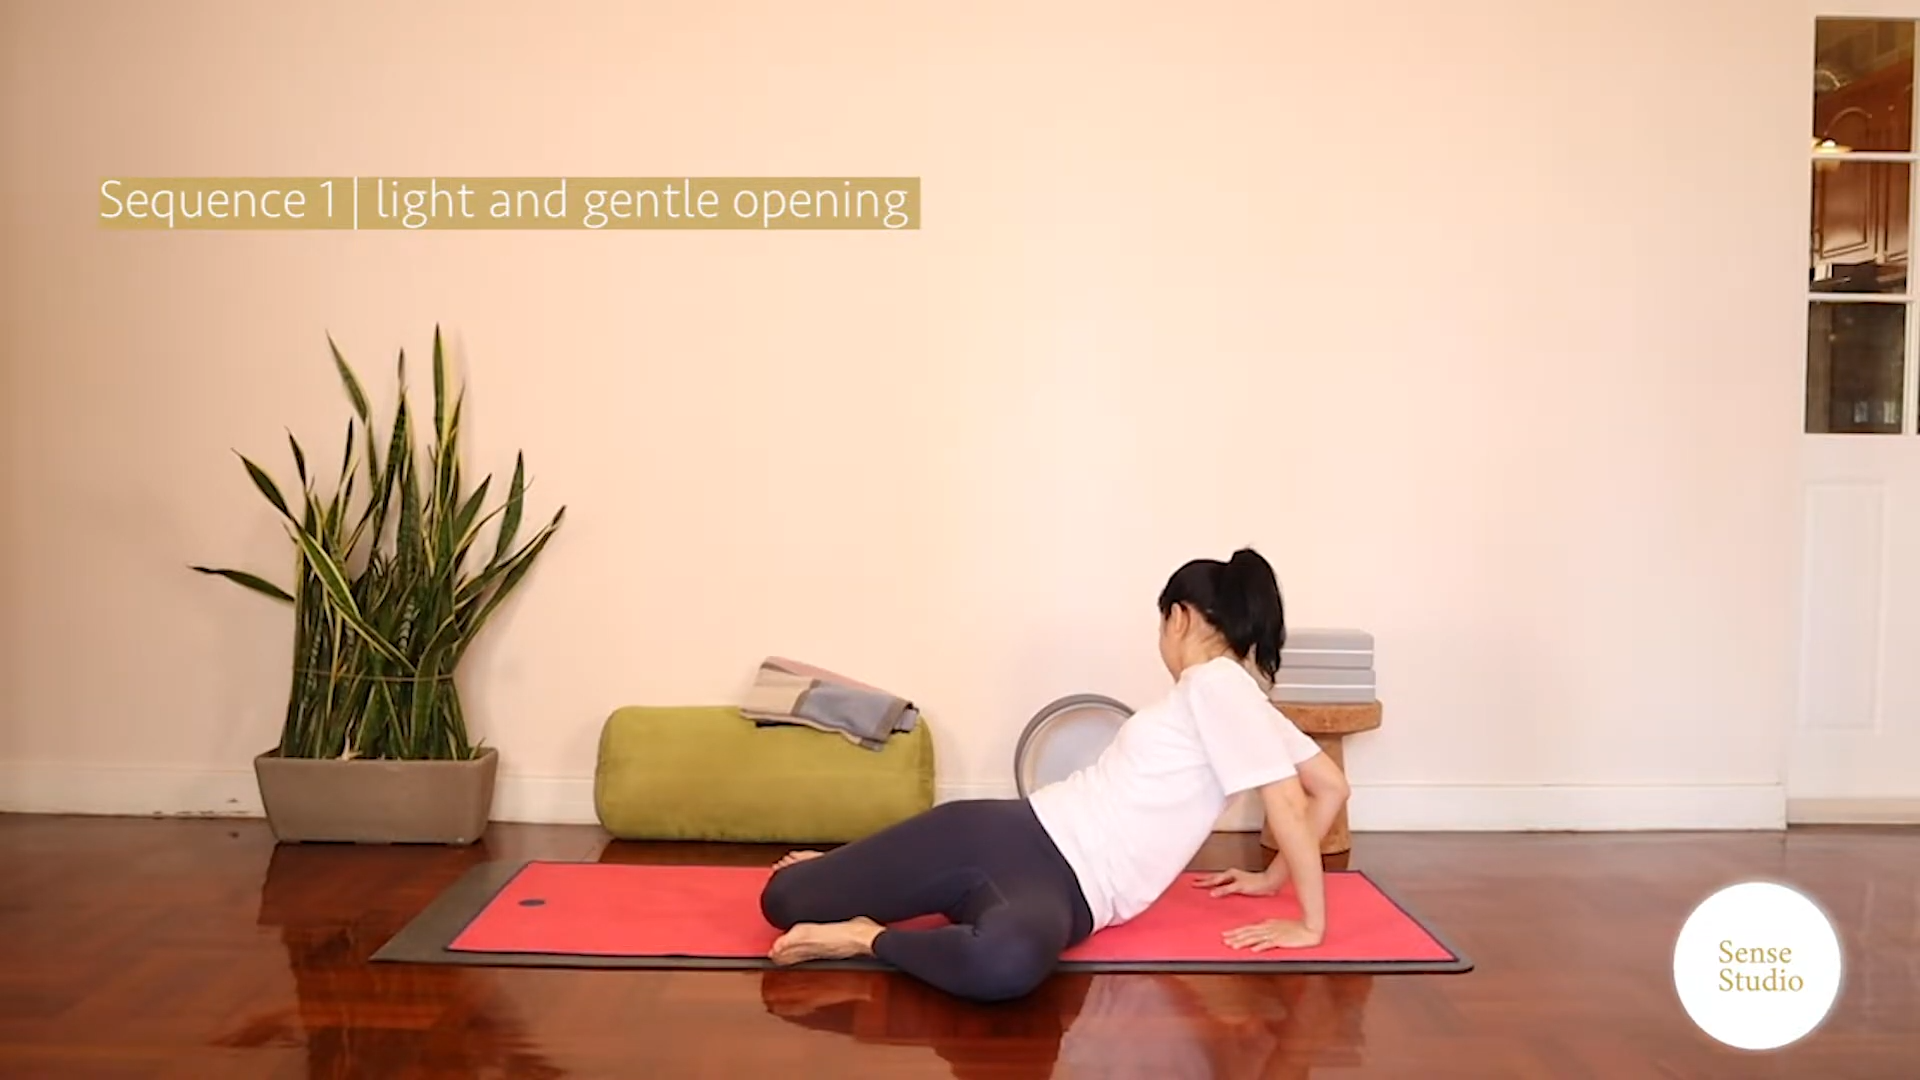
Gentle Movement for tight hips

Gentle Movement for tight hips
Yoga Pose Two - Seated Hip Opener

Seated Hip Opener for Tight Hips
To Set the Pose: Sitting on the floor or elevating your seat on the towel or block.
Bend the left leg and grab the outer part of your left foot.
Set your left knee just below your armpit.
Hold the Pose for around 3 - 5 breaths as long as you feel comfortable.
Yoga Pose Three - Garland Pose and Variations (Malasana / Yogi Squat)
To Set the Pose: Spread the feet shoulder distance apart.

Garland Pose for Tight Hips
Toes are slightly pointing outward.
Place the palms in front of you for the centring.
Keep your spine erect.
Variation
If you find it hard to stay in the Pose, place the block underneath your hips.
Yoga Pose Four: Easy Pose and forward fold (Sukhasana)
To Set the Pose: Sitting cross-legged on the floor.
Consider elevating your seat with a block underneath your hips.
Fold forward and rest your arms on the floor or block as long as your spine remains straight.

Seated Easy Pose for Tight Hips

Seated Easy Pose for Tight Hips
Yoga Pose five - Half-Happy Pose
To Set the Pose: Prepare one yoga strap and one yoga block.
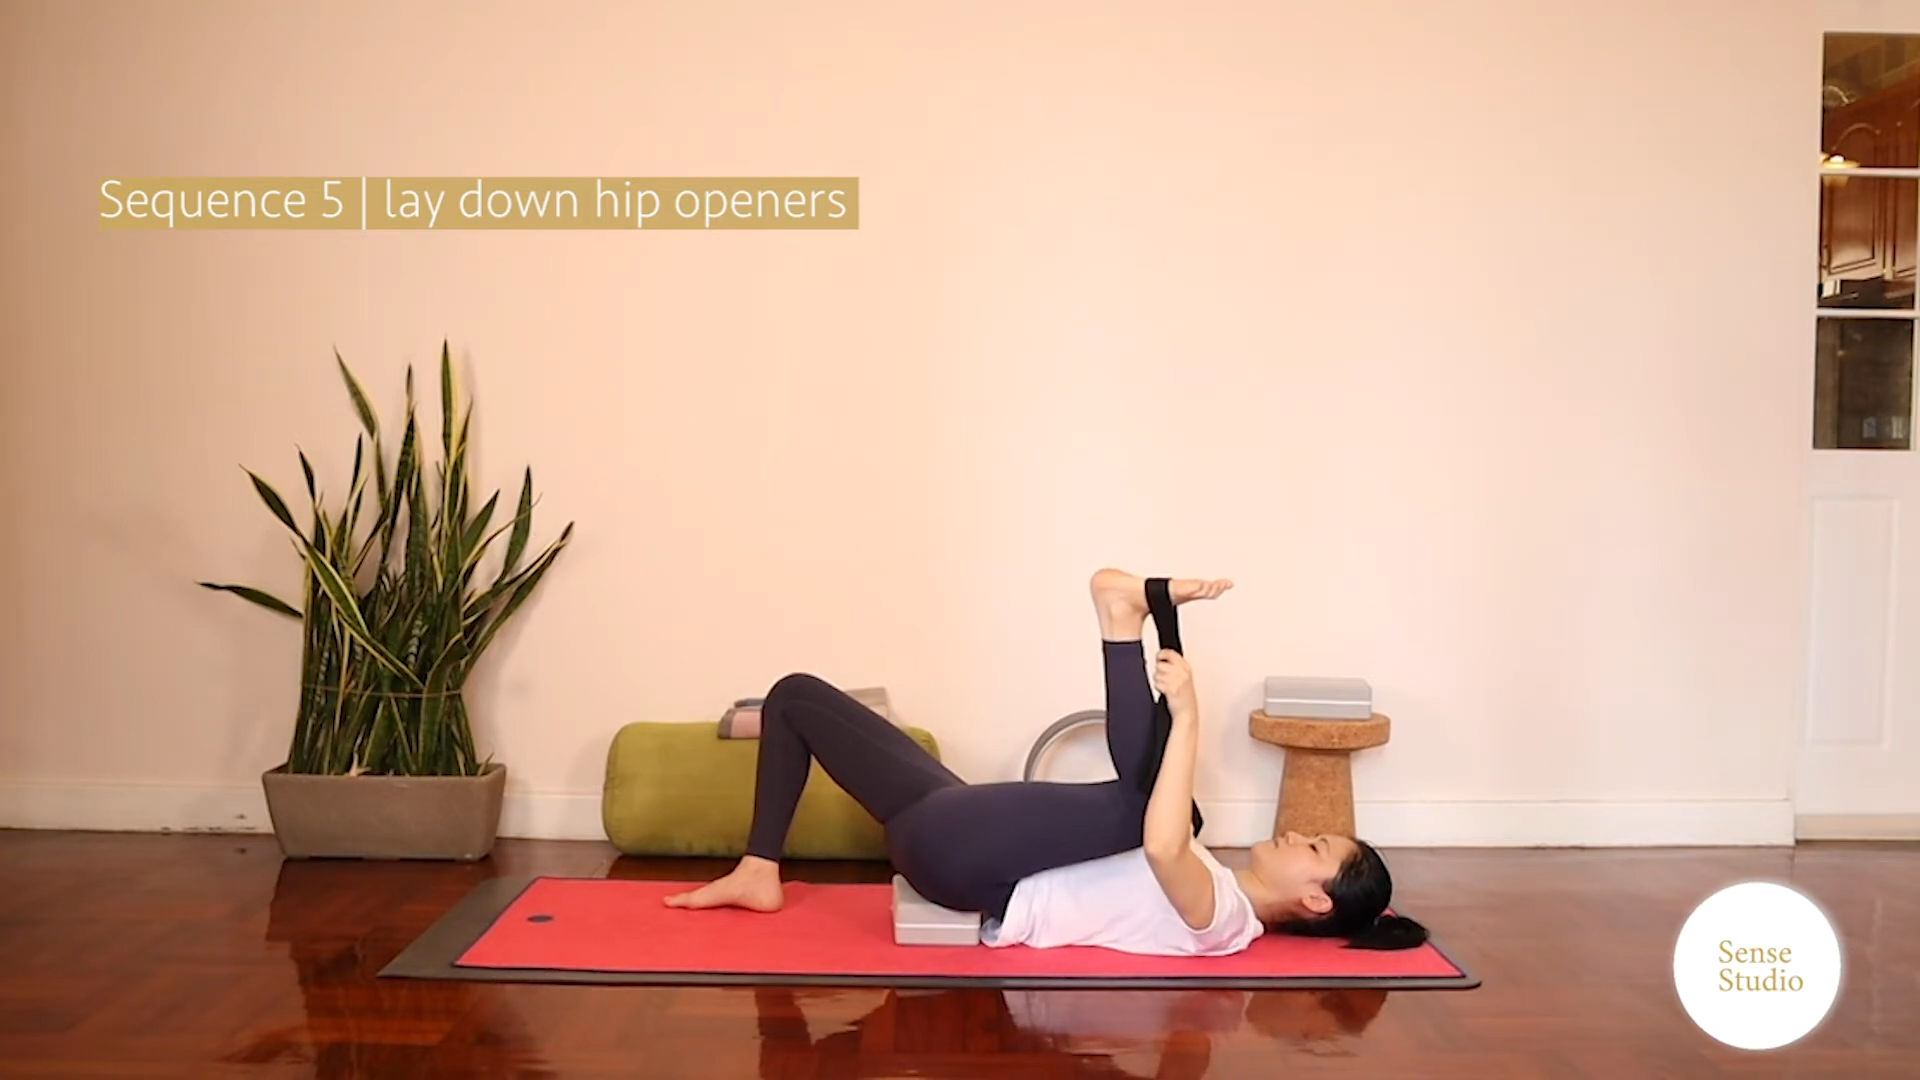
Yoga Pose five - Half-Happy Pose
Start by lying flat down on the ground.
Bend the knees with your feet on the ground, then put the block underneath your hips just below your waist.
Next, lift the left leg and hold the left foot directly or hold it with the strap.
Feel the opening of the left hip, and avoid extra pressure on the left knee.
Hold the Pose for around 3 - 5 breaths as long as you feel comfortable.
More Yoga Asana Articles

Free Your Mind from Distractions: 3 Simple Steps Inspired by Yoga Sutra Verse 1.41
"Free Your Mind from Distractions: 3 Simple Steps Inspired by Yoga Sutra Verse 1.41" offers practical tips to help you achieve a clear and distraction-free mind. With the help of Yoga Sutra Verse 1.41, we explore identifying distractions, establishing a distraction-free lifestyle, and living like a yogi. Read on to discover how you can free your mind from distractions and unlock your full potential.
Free Your Mind From Distractions - Inspirations from the Yoga Sutra Verse 1.41

Photo by Jeffery Erhunse on Unsplash
This month, let's find inspirations in the Yoga Sutra for those struggling with constant distractions, explore some healthy steps you can take to audit your busy modern lifestyle and keep you stay on track towards your life's purpose.
According to the Yoga Sutra Verse 1.41, the mind is compared to a flawless diamond when it is completely free from distractions.
Yoga Sutra Verse 1.41 - "When the mind is free from distraction, it is possible for all the mental processes to be involved in the object of inquiry. As one remains in this state, gradually one becomes totally immersed in the object. The mind then, like a flawless diamond, reflects only the features of the object and nothing else. " The Translated Verse from The Heart of Yoga by T. K. V. Desikachar
Learn three simple steps to combine the wisdom of yoga with modern life, clear your mind, and live with purpose.
Step 1 - Begin with Awareness - Identify Distractions
Distractions can significantly impact our focus. We must recognize and address them, whether they come from external stimuli or internal thoughts. By doing so, we can avoid being overwhelmed and maintain our ability to concentrate.
Let's put out some examples that you may find relating to yourself,
FOMO (Fear of Missing Out) - The fear of missing out on social events, experiences, or opportunities drives us away from what our mind and body genuinely need.
EXAMPLE: You choose to attend a party instead of reading a book and relaxing at night because you are fear of missing out.Multitasking: Multitasking may seem efficient, but it often leads to divided attention, reduced productivity, and increased stress levels.
Example - You are working at the office and attending the "online live class" simultaneously. You end up taking longer to finish your work and need help to grasp most of the ideas from the class.Instant Messaging Apps: Instant communication apps like WhatsApp, Messenger, and Slack can be distractions.
Example - You're hiking with friends, enjoying nature and being present. But your phone keeps buzzing with WhatsApp messages. You give in and start texting, ignoring your friends and surroundings.
You may notice there are many more distractions than those listed above. Try to write down as many as you can and identify all unnecessary distractions that are happening around you.
Step 2 - Establish a Distraction-free lifestyle

Photo by Glenn Carstens-Peters on Unsplash
Commit to One Thing At A Time - Dedicating your full attention and energy to a task or activity for one week. Focusing on just one thing helps free our minds from distractions. When we are fully present, we can enhance our efficiency, productivity, and mindfulness. We work with less stress and produce higher-quality output when we commit ourselves to one task at a time.
Plan Your Day - Every night, take 10 minutes to plan your following day. Rather than being reactive to external circumstances, plan your day proactively. Setting your intention for the next day and creating a structured plan can help you allocate your time efficiently and maximize productivity. Most importantly, planning helps you avoid distractions and stay focused on your goals. By planning your day, you can free up mental space and take control of your life.
Learn to Say No - This week, try setting three healthy boundaries and make yourself a priority. When you have a clear understanding of your purpose, it becomes easier to know what to prioritize. Saying no when necessary can help protect your time and energy. By cultivating healthier boundaries, you can make more intentional choices and lead a more fulfilling and purposeful life.
Schedule Me-Time - It is recommended that you devote around 3 to 4 hours every week to enjoy the activities you love. These activities can be anything from meditation, exercise, hobbies, reading, or simply spending some quiet moments alone. This "Me-Time" can help you recharge your batteries, reduce stress, and boost your energy levels. This intentional self-care practice is essential for maintaining balance, enhancing overall happiness, and fostering a deeper connection with yourself.
Step 3 - Live Like a Yogi - Yoga is the Journey to Inner Peace

Photo by Jose Vazquez on Unsplash
Easy Breathing Exercise - Set a Timer for 5 minutes and focus on your breath. As yogis, we always bring our attention back to our breath. It is the easiest way to access the present moment without fancy techniques. Set you timer and follow the steps,
1/ Close your eyes.
2/ Play some relaxing music you like.
3/ Focus on your breathing, gently in and gently out.Practice Mindfulness Meditation - Whenever you need a break, set a timer for another 5 mins. To practice mindfulness meditation,
1/ find a quiet and comfortable space
2/ close your eyes
3/ focus on your breath, bodily sensations, thoughts, and emotions without judgment.
4/ Observe the sensations as you breathe and gently return your focus to the breath whenever any distractions arise.
Practice Yoga Asana - Taking time to practice yoga at least once a week. Yoga is a great way to release the tension stored in your body, quieten the fluctuations of your mind, and connect with your breath and inner self. Every yoga pose invites you to be fully present in the moment, fostering a deep sense of mindfulness and inner awareness.
Conclusion
If you're tired of being constantly distracted, it's time to take action. Following the three essential steps to help you clear your mind of distractions and live a more purposeful life.
Firstly, recognise your distractions.
Secondly, commit to a distraction-free lifestyle.
Thirdly, live like a yogi to achieve mindfulness, relaxation, and focus.
Incorporating these steps into your daily routine is crucial to declutter your mind, boost your productivity, and lead a fulfilling life. So, don't wait any longer to take control of your distractions and free your mind!
Frequently Asked Questions (FAQs)
How can yoga help me keep my mind from distractions? Yoga is a holistic practice that can help you keep your mind focused and free from distractions. Through breath awareness, physical movement, meditation, and relaxation, yoga promotes mindfulness, reduces stress, and improves focus. So, if you want to keep your mind from distractions, practising yoga can be a great way to achieve that.


Mastering Tadasana: The Foundation of Yoga (The Mountain Pose)
Tadasana, also known as the Mountain Pose, derives its name from Sanskrit, where "Tada" means mountain, is the foundational yoga pose for all standing asanas.Tadasana embodies the essence of standing firm and upright like a mountain. In the practice of yoga, maintaining a steady and unwavering stance, akin to a mountain, is crucial in all standing poses. This foundational pose serves as our starting point and anchor as we delve into the more dynamic aspects of our yoga practice.

Understanding Tadasana: The Mountain Pose
Tadasana, also known as the Mountain Pose, derives its name from Sanskrit, where "Tada" means mountain, is the foundational yoga pose for all standing asanas. Tadasana embodies the essence of standing firm and upright like a mountain. In the practice of yoga, maintaining a steady and unwavering stance, akin to a mountain, is crucial in all standing poses. This foundational pose serves as our starting point and anchor as we delve into the more dynamic aspects of our yoga practice.
Finding Your Ground: The Basics of Tadasana (The Posture Alignment)
Practicing Mountain Pose bestows upon us a remarkable sense of grounding. As we stand tall and maintain a steady mental state, our feet (Pada Bandha) establish a strong connection with the Earth, while our muscles remain lifted and actively involved.
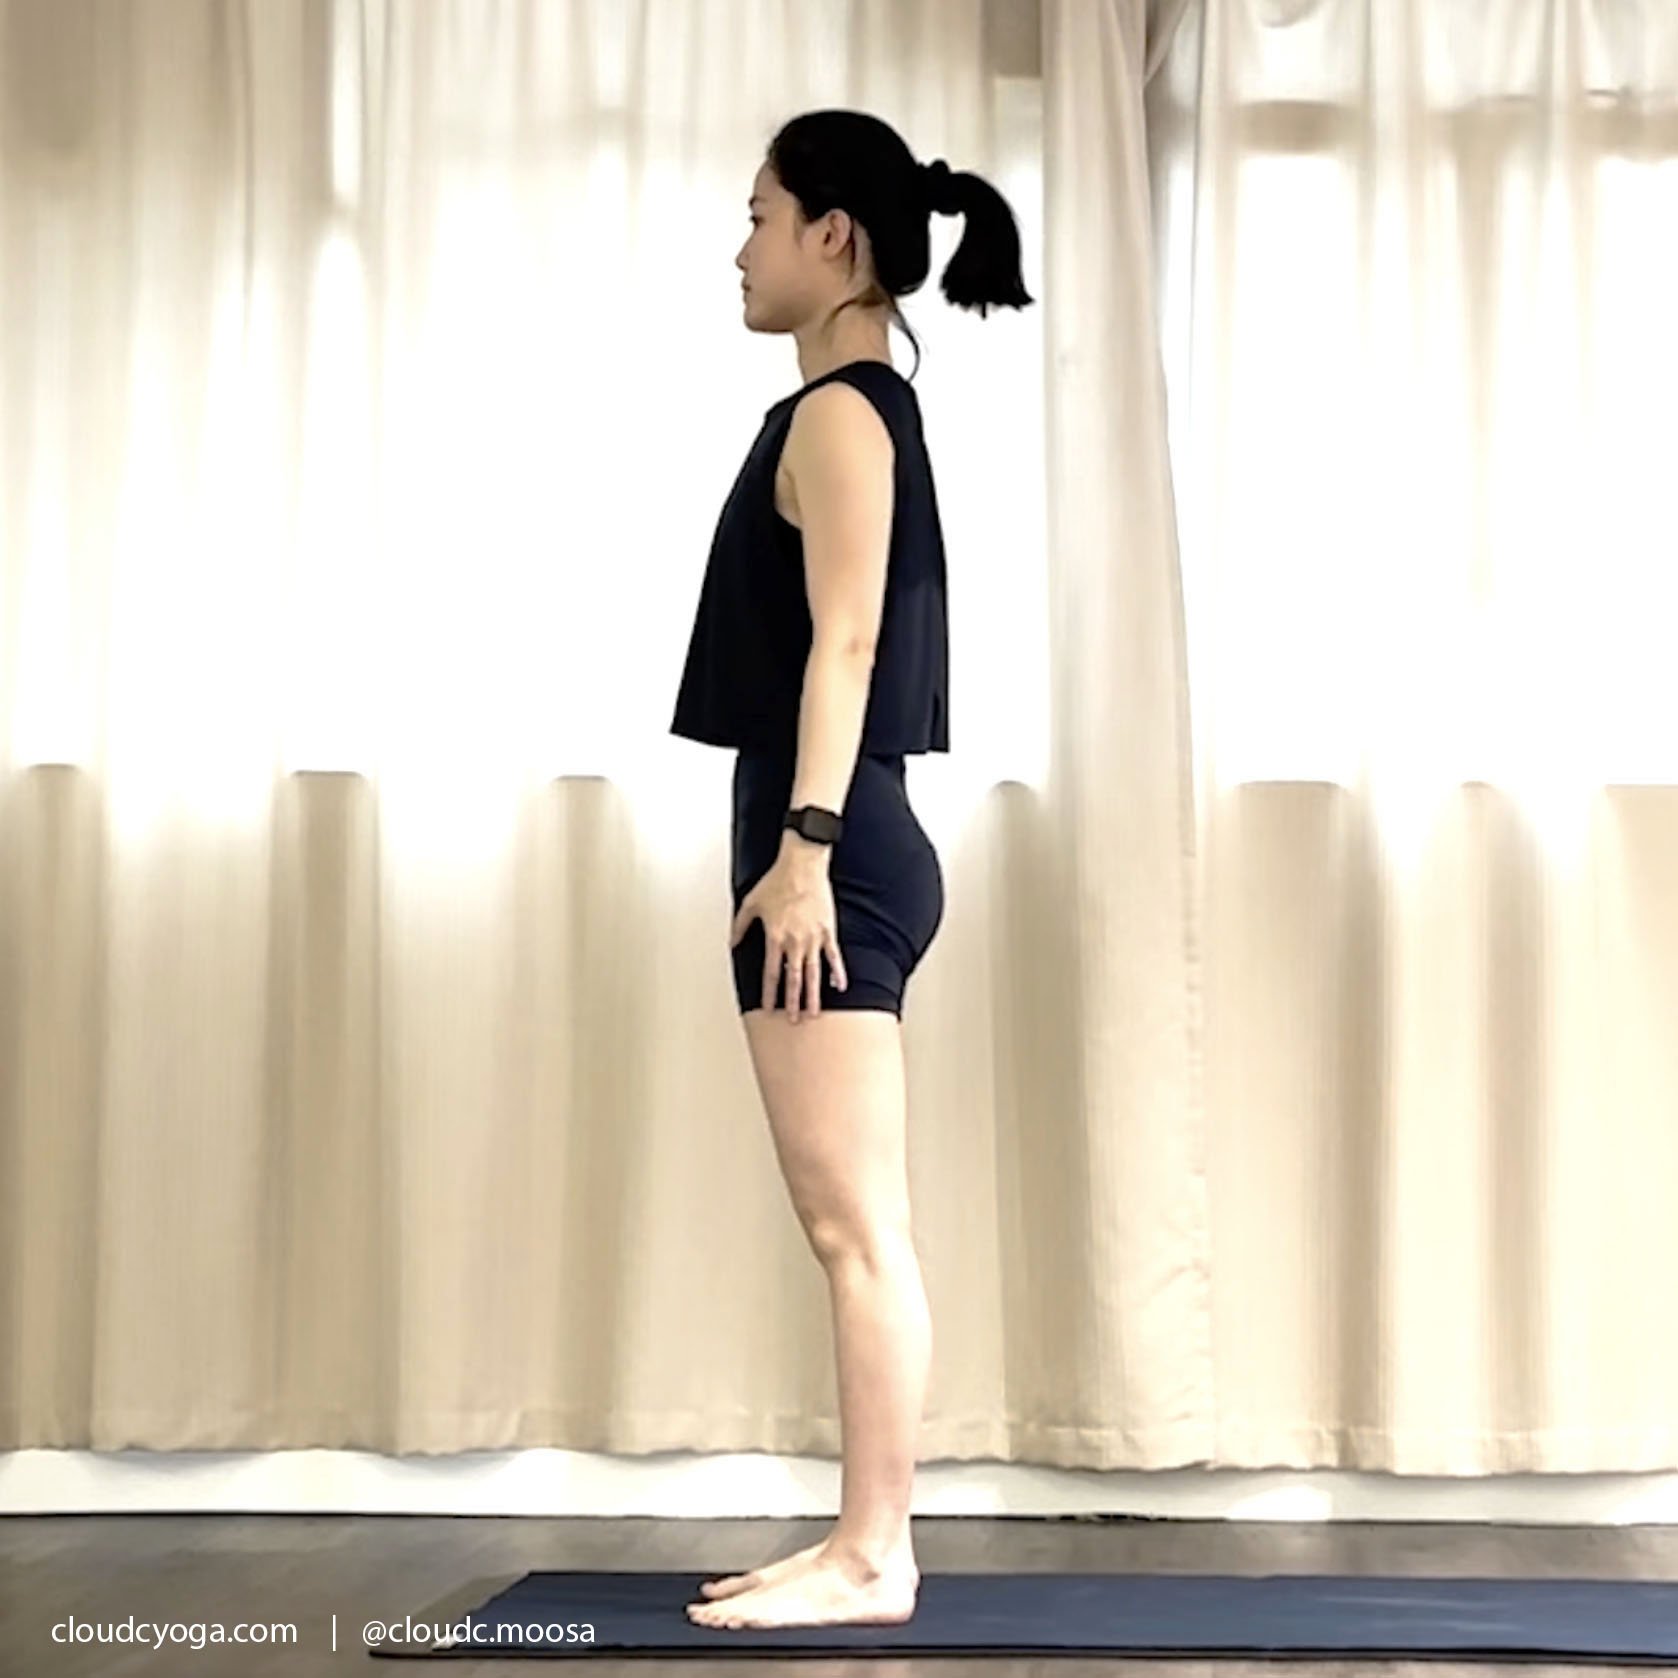
Mountain Pose / Tadasana - follow these steps for practice
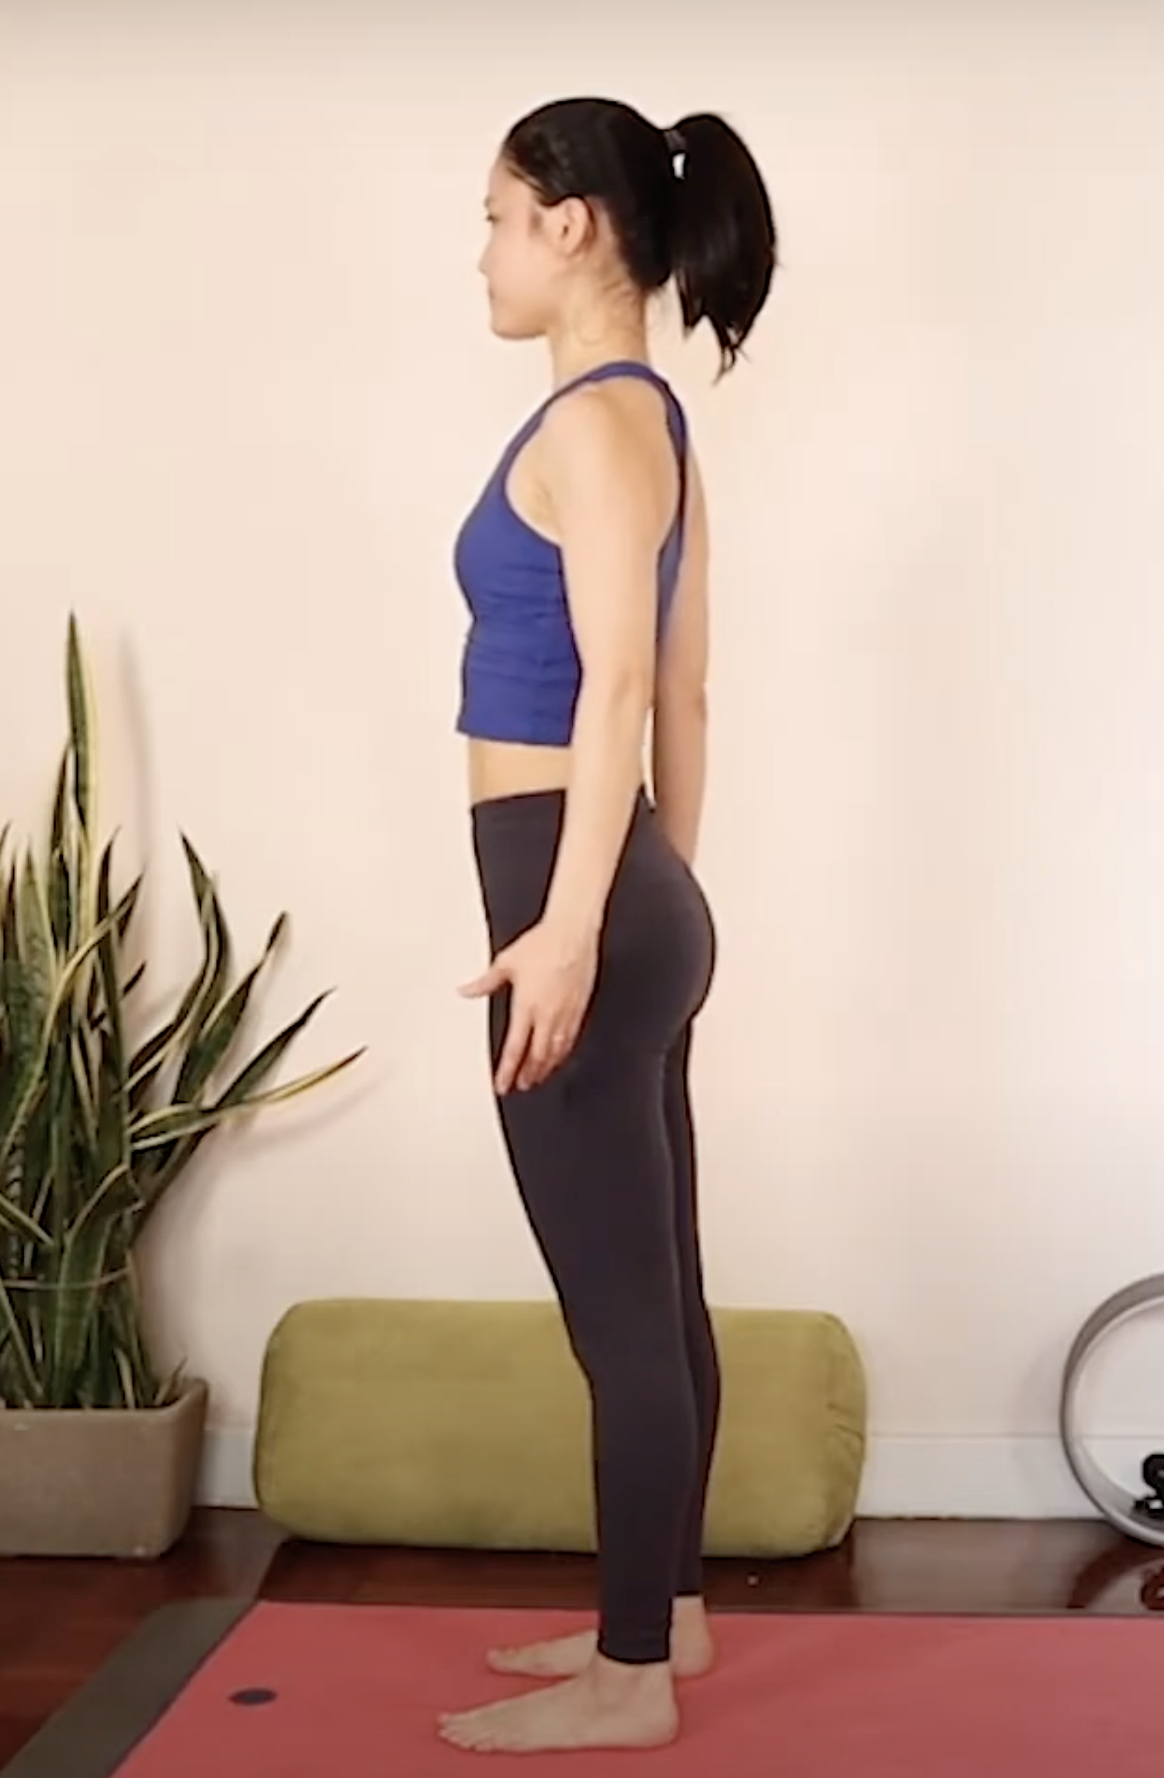
Start by standing tall and straight, grounding firmly into the earth.
Option 1 - Feet together, the heels and big toes touching each other.
Option 2 - Feet at hip distance if you prefer a more stable standing position.
Establish a connection with your feet by consciously engaging them. Elevate the arches of your feet, ensuring that the majority of your body weight is supported by the heels. Additionally, strive to evenly distribute the weight across the front of your feet.
Engage the hip muscles and activate the muscles at the back of the thighs, lift your kneecaps.
Roll your shoulders back and down, stomach tucked in, chest lifted, spine elongated, and neck in a straight alignment.
Allowing your arms to hang naturally by your sides.

The Feet and Tadasana
Elevate the arches of your feet, ensuring that the majority of your body weight is supported by the heels. Additionally, strive to evenly distribute the weight across the front of your feet.
Image from RichRoskopflmt.com
The Counter Pose of Tadasana (Mountain Pose)
The counter poses to Mountain Pose consist of the following:
Uttanasana, also known as Standing Forward Bend.
Ardha Uttanasana, which is the Standing Half Forward Bend.
Adho Mukha Svanasana, commonly referred to as Downward-Facing Dog.
Balasana, also known as Child's pose.
Harnessing the Power: Benefits of Tadasana
Mountain Pose/ Tadasana, is highly effective in enhancing posture and body awareness, while simultaneously strengthening the legs and promoting proper alignment.
Standing Balancing Yoga Practice.
Improve Posture: Understanding the proper posture while standing is crucial for maintaining good overall health as many people tend to overlook the correct method of standing.
Build Solid Yoga Practice Foundation: This particular position serves as the cornerstone for all standing poses within the realm of yoga. It is strongly advised for beginners to commence their practice with this pose before advancing to other standing balancing poses. To refine your technique in performing standing balancing poses in yoga, we invite you to explore our tutorial video. <<HERE>> .
May Help Alleviate Back Pain: By strengthening the core and improving spinal alignment, Tadasana helps alleviate tension and discomfort in the back, promoting overall well-being.
Enhance Concentration: Through mindful attention to alignment and breath, Tadasana cultivates mental focus and concentration, fostering clarity of mind.
Conclusion: Ascend to New Heights with Tadasana
In the vast landscape of yoga, Tadasana stands as a timeless embodiment of strength, poise, and presence. Building a solid foundation of yoga practice will facilitate you with a lifelong practice that is safe and with ongoing positive growth for your physical, mental, and spiritual health.
FAQs
Can Tadasana help with back pain?
A correct alignment of posture is essential in relieving back pain, and Tadasana serves as the fundamental pose for maintaining proper alignment, which holds great significance in our daily lives. As mentioned by B.K.S Iyengar in the Light on Yoga “One feels light in the body and the mind acquires agility. If we stand with the body weight thrown only on the heels, we feel the gravity changing; the hips become loose, the abdomen protrudes, the body hangs back and the spine feels the strain and consequently we soon feel fatigued and the mind becomes dull. It is therefore essential to master the art of standing correctly.”
What are the mental benefits of practicing Tadasana?
The art of Tadasana demands a profound sense of mindfulness and attentiveness towards maintaining proper body alignment and regulating one's breath. By enhancing clarity and concentration, practitioners can establish a more profound connection between their mind and body.